

Introduction to using your Freezpen
Gently manipulate all the components of your Freezpen instrument. Never use more than gentle hand force.
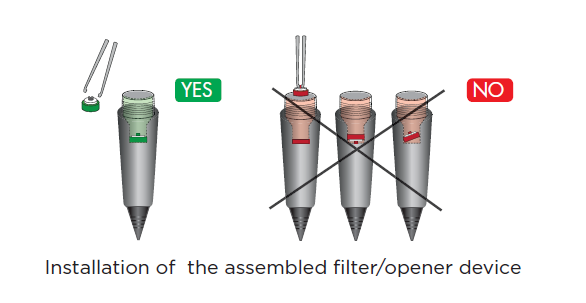
Incorrect placement of the filter/opener will cause irreversible damage to the instrument.
Left seals in the loading cavity while placing a new filter/opener will cause instrument failure.
When loaded, the instrument is under high pressure. Any manipulation other than the normal use may be dangerous.
Never block the gas release opening at the top of Freezpen’s backend!
All external parts can be wiped with a cloth soaked in any noncorrosive disinfecting solution. Never immerse the entire instrument in a disinfecting solution.
Never expose capsules to temperatures over 50°C. Leave the cap on the device when not in use.
The Freezpen should be handled with care. When storing the instrument ensure that the trigger is in free position.
Freezpen instruments are intended for professional use only.
Best results are obtained with the instrument and the capsules at room temperature (21°C/70°F). Lower and higher temperatures will give different values in respect of pressure and the density of the cryogen. Over 25°C, the quantity of liquefied N2O in the Freezpen jet will decrease.
Empty cartridges should be discarded as metal scrap.
Step 1 I Empty the loading cavity
Release any unused gas from the used capsule by unscrewing the applicator and by pressing the button. Then unscrew the capsule cover cap. Discard the used capsule and check that the cavity is entirely empty.
Step 2 I Load a new capsule
The capsules are delivered in blisters with an assembled filter and capsule opener included.

Open the blister. Take out the filter/opener. Hold the tip of the Freezpen pointing downward. Place the filter/opener and make sure that it seats flat at the bottom of the loading cavity. The trocar of the opener must be pointed upward. Take the capsule and place it in the cavity, on top of the filter/opener device.
Step 3 I Puncturing of the capsule
Keep the frontend pointing downward. Gently screw the Freezpen backend to the point of contact resistance. Now a last turn must be made in an rapid uninterrupted rotation. You may eventually hear a short hissing sound. The shorter the hiss, the better
Step 4 I Use your Freezpen
Remove the applicator cap. Push the trigger to start the flow of cryogen. The releasing of the trigger will close the flow of cryogen. You may observe that after releasing the trigger, the remaining gas in the applicator is discarded. The working time of one 8g capsule is 95 seconds of continuous flow at a room temperature of 19°C.
The working time of one 16g capsule is 190 seconds of continuous flow at a room temperature of 19°C.
With respect to the content of the cartridge hold the instrument vertically with the tip directed downward. An angle of less than 45° must be avoided.
Position of the Freezpen
Effective application
Before starting treatment consider the pathology, the location, the size, the depth, the skin type, degree of tanning the season of the year and other parameters that may influence the result of the treatment. While using Freezpen the applicator tip with the jet of cryogen Installation of the assembled filter/opener device should be held 0,5 to 3 mm from the lesion.

Correct use
FREEZEPEN MEDIKELL
When further than 5 mm from the applicator tip the liquefied N2O will have expanded into gas phase which is not effective for achieving therapeutic results. By approaching the lesion with the gas flowing you will observe the focal point of the jet on the tissue. The closer you will approach the lesion, the more freezing power you will apply to the tissue. It is recommended to keep a greater distance for the smaller and more delicate procedures. The amount of liquid N2O that you wish to apply can be controlled by moving the applicator quickly towards and away from the tissue. Circular and crossing movements have the same effect. Do not hold the Freezpen applicator still over the lesion. It may flood the area and damage healthy tissue surrounding the lesion. This can cause blisters and pain to patients. The condensation of the humidity in the air on the frozen working area during the operation may create an ice field on top of the lesion. This ‘igloo’ will hinder the effective working of the liquid phase of the cryogen (at -89°C/-128°F) and should be removed with the applicator tip by gently wiping the ice. Although, they are relatively harmless protect the area from blown ice shards.
After the thawing, the tissue turns reddish and has the aspect of a zone of inflammation due to interstitial bleeding. Some edema and/ or blister may occur and will discomfort for some hours. Always protect this new grown skin by using a sunblocker for 8 to 20 days after the scab has come off. The learning curve for utilizing the Freezpen is short. With the application of the measures for good practice, the Freezpen provides sufficient control on the parameters for achieving good treatment results and avoid unintended damage to tissue.

FREEZPEN
Duration/Depth of the treatment.
Hold the tip of the applicator as close as possible to the lesion. In all literature, the rapid drop of temperature (thermal shock) is described as a critical criterion. However always relate to the part of the body where the operation is applied. In some parts, skin is thinner which requires more caution. A typical freeze on viral infections may last from 5 to 10 seconds for a small flat wart, and up to 45 seconds for a full thickness plantar wart. For general purposes most lesions take about 2 to 30 seconds. The duration of the treatment time will depend on the surface area and the thickness of the tissue. Thickness must be estimated by the operator on clinical experience.
After the first freezing cycle, the tissue should be allowed to thaw for about 30 seconds followed by a second freezing. Please note that in the second cycle the tissue will freeze faster. This ‘freezethaw-freeze’ technique offers the best opportunity for success. You will find this procedure in most literature on cryotherapy. A follow-up visit is recommended after 3 weeks to confirm that all the pathological tissue has disappeared or that a follow-up treatment is necessary.
Interact with your patients.
Inform patients that there may be a pain sensation similar to a ballpoint being pushed onto the skin. Generally little or no discomfort is experienced during the first few seconds when the treatment of healthy tissue is avoided. The freezing will reach the caudal extent of the lesion after a given amount of time related to the depth of the lesion. From that moment, the patient will experience a pain sensation. This may be the moment to stop treatment. You may eventually add a few more seconds depending on the patient’s comfort level and upon the clinical evaluation of the operator. There might be a little residual stinging for some time after the treatment. Occasionally, a blister might form and persist for a few hours.
